
How to use Simple Expression in Davinci Resolve
During recent months, I have been working on video projects in Davinci Resolve, which involved creating custom titles. During that time, I learned a lot about using Simple Expressions to position nodes relative to each other.
This post condenses my newly acquired knowledge for future reference.
This post assumes you have a basic understanding of the Davinci Resolve Fusion tab, including the Text+, Merge, and Background nodes.
Motivation
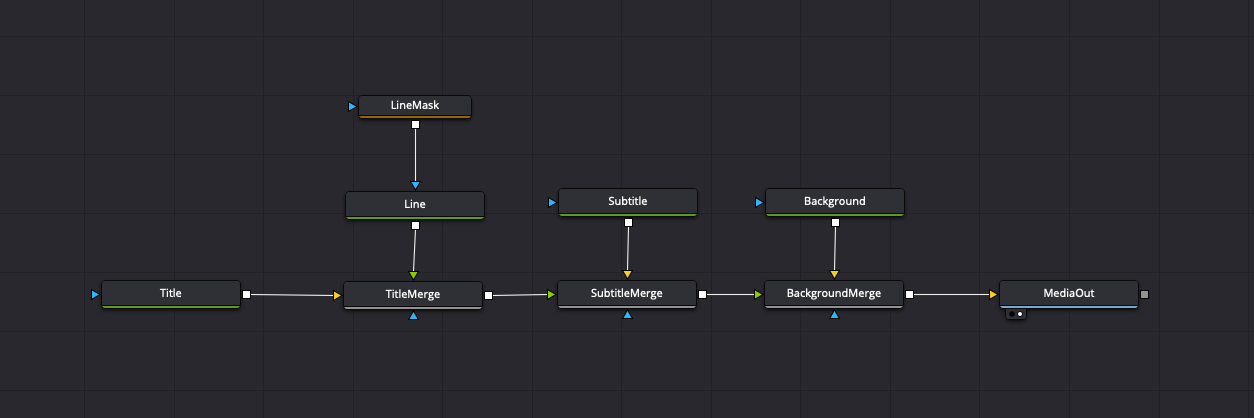
Let’s say you want to create a title template that consists of a title, an underline, and a subtitle. You create a new Fusion composition and end up with something like this:

Notice that all elements are positioned manually. Whenever you change the title, the underline won’t change its length. Or even worse, when you add a line break to the title, the position of the underline and subtitle would need to be adjusted manually.

If you use the title screen only in one place, it is acceptable to adjust the elements manually, but as soon as you start to reuse it or plan to use it as a standard design element, it gets annoying pretty quickly.
In this post, I want to introduce you to some basic and more advanced Expression Tips & Tricks and finally show you how you can use expressions to position nodes within your composition dynamically.
Expression Basics
Expressions are helpful whenever a node property depends on another node.
Adding an Expression to a Field
With the Inspector panel open, you can add an expression to a property. Just right-click a property and choose Expression. A text input appears below the property containing the previously set value.
Even quicker, for properties other than Text+‘s text input field, you can add an Expression by entering an = in the input field.
Fusion Expressions uses the scripting language Lua, but fear not; you don’t have to be a software engineer to understand the syntax.

Referencing other Nodes within an Expression
Each node can be referenced by its name, which is unique within a composition. When you hover over a field in the inspector, Fusion shows the node’s name followed by the property name in the bottom left corner.

Using an external Text Editor
The size of the expression input field is way too small to write a more complex expression containing calculations comfortably. Please do yourself a favor, use an external text editor, and copy and paste the expression between it and the expression field. My editor of choice is Visual Studio Code. Fortunately, Davinci Resolve keeps the formatting of the expression, even line breaks.
Displaying Expression results in a Text node
For testing purposes and exploring Fusions’s data structures, adding a temporary Text field to try Expressions can be helpful. Right-click the text input field and enter your expression wrapped into a Text structure like Text({MyExpression}), e. g. Text(Title.Output.DataWindow).

This technique allows us to display the result of an expression and, in this case, enables us to inspect the data structure of a property.
Calculating the Dimensions of a Text Node
The previous section shows a look inside the Title.Output.DataWindow property, an ImageRectl structure consisting of four properties left, bottom, right, and top.
The properties represent the distance in pixels of the respective border to the bottom left corner of the composition. When you alter the Title node, like changing the center or its text, the properties of the DataWindow change accordingly.
Therefore, the DataWindow enables us to calculate the node’s width and height.
Since Fusion uses relative values for positioning nodes, we often need to calculate the relative width and height based on the screen dimensions.
Luckily, the Title.Output also provides Height and Width properties, containing this information.
More Advanced Expression Usages
Until now, the listed expressions were relatively simple and only consisted of a single return value. This section shows more advanced expressions, which utilize more features of the Lua programming language.
Using Multiple Lua Statements in a Single Expression
By default, the expression field expects a return value (e. g. a Number, Point, or Text).
If you want to unleash the full power of the Lua programming language, start the expression with a Colon :, which allows you to use multiple statements. Just make sure to return the resulting value explicitly using the return keyword.
The above example assigns Title.Output.DataWindow to the variable window, which is then used to reference the DataWindow properties. Being able to write multiple statements allows us to write more readable code and split calculations into easier-to-understand steps.
Declaring and using Functions
Instead of writing the same expressions repeatedly, we can declare concise helper functions that are easier to reuse.
While the expression above works perfectly fine, it is not easy to reuse for different nodes since we would have to replace all occurrences of Title.
The expression above declares a helper function called relWidth, which takes an image parameter and calculates its relative width. The function is called with the parameter Title.Output, and its result is returned as the result of the expression.
Printing Information to the Console
Instead of outputting expression results to a Text node, you can print the result to the console. To open the console window, choose Workspace > Console.
Then, add an expression that includes print statements. The following chunk of code prints out property values of Title.Output.
This expression declares a helper function called printImageData that prints out the properties of an image. Then, the function is called with the parameter Title.Output. Finally, I return some placeholder text since I am using these statements within the expression field of a Text node.

Creating a dynamically adjusting Title Screen
At the beginning of this post, I showed you a simple title screen that requires manual adjustments as soon as you change its content. Backed up with the expression basics, let’s change the title screen so it adjusts automatically using expressions.
If you want to follow along, create an empty fusion composition and paste the following content.
Positioning a Node relative to another Node
The underline should always be below the title. Therefore, we add an expression to the LineMask’s Center property and enter the following content:
Point(Title.Center.X, Title.Center.Y - 0.1)

This expression sets the X value to the Title.Center.X value and the Y value to the Title.Center.Y value minus some spacing.
Positioning a Node below another Node
Since we know how to calculate the dimensions of a text node, we can improve the expression for the LineMask.Center property.
First, change the V-Anchor property of the Title node to Top. This makes calculations involving the Title node more convenient since its anchor is now positioned at the top.
To place the line perfectly below the Title, alter the Center expression of the LineMask node to:
To calculate the Y value, we take Title.Center.Y and subtract the relative Title height and some spacing of 0.02.
Setting the Width of a Rectangle based on the Width of another Node
To calculate the width of the underline based on the title’s width, add the following expression to the LineMask.Width property:
As before, we calculate the relative width of the Title node and subtract some spacing.

Finishing up the Composition
With the abovementioned techniques, you can also position the SubTitle below the LineMask. To do so, change the Subtitle’s V-Anchor property to Top and add this expression to its Center field.
For this particular case, I did not bother to consider the height of the line since it is constant within my composition.

Finally, the finished version ensures that underline and subtitle nodes are positioned relative to the title. Additionally, the layout does not break when the title size increases. However, there is still much room for improvement, so feel free to build upon my final composition.
References & Sources
- Davinci Resolve Manual (Simple Expressions are explained starting from page 1465)
- Fusion SDK Documentation (e. g. page 79 shows a list of image attributes)
- Lua Documentation
- Davinci Resolve / Fusion Expression Cheat Sheet
- Simple Expressions to save your day
- Blackmagic Fusion Simple Expressions-Cookbook + Tutorial